Table of Contents
CW Audio
Fldigi generates CW in one of several ways:
- inserting a keyed tone at the current waterfall audio frequency,
- WinKeyer Interface keyline control via a Winkeyer (or compatible) unit,
- nanoIO Interface keyline control via a Mortty or NanoIO unit,
- CW Keyline Configuration keyline control via DTR or RTS on a serial port,
The inserted keyed tone CW carrier frequency is the USB carrier + the audio frequency, or the LSB carrier - the audio frequency. If fldigi is tracking and receiving a CW signal on the waterfall your transmitted signal will be exactly on the frequency of the other operator. You probably cannot use your transceivers CW filter unless that filter can be used with the SSB mode.
QSK and the TAB KEY
If you are operating QSK with a separate transmitter / receiver you can very quickly stop your transmit signal with the TAB key. In the CW mode only the TAB key causes the program to skip over the remaining text in the transmit text buffer. The text that is skipped will be color coded blue. The program remains in the transmit mode (PTT enabled), but since the buffer is now empty no A2 CW signal is generated. Code transmission will then restart with the very next keyboard closure of a valid CW character.
Pausing transmit
The Pause/Break momentarily key stops sending text. Pressing it again resumes transmission.
Aborting transmit
The Escape key is used to immediately stop text transmission. The Tx buffer is cleared.
WPM adjustment
In CW mode the status bar is changed to include a transmit WPM adjuster. Use the arrow buttons or the mouse. Mouse wheel up/down changes transmit WPM by +/- 1. Hold the shift and mouse mouse wheel changes transmit WPM by +/- 10. The "*" button immediately to the right of the WPM adjuster is used to toggle between the current and the default transmit WPM.
The transmit WPM can also be adjusted with three hot keys:
- Numeric keypad "+" increases the transmit WPM by 1
- Numeric keypad "-" decreases the transmit WPM by 1
- Numeric keypad "*" toggles between the selected transmit WPM and the default transmit WPM
The "Default" control on the CW tab sets that default value. If during a QSO you needed to slow down to give the other op a better chance to copy what you are sending, just hit the "*" on the numeric keypad and the CW code will immediately switch to sending CW at the set default value (18 wpm in this example). Press the "*" again to return to back to the CW speed that you were previously using.
Each time the transmit WPM is changed the receive decoder WPM tracking is reset to the new transmit WPM. This allows you to quickly force the decoder to a new WPM range.

Farnsworth keying
You might want to use farnsworth keying to provide a character rate that is faster than the word per minute rate.
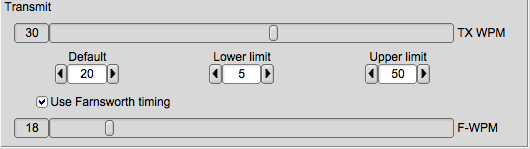
Set the F-WPM slider to tthe character rate and enable the Use Farnsworth timing check box. When the TX WPM is set to a speed below the Farnsworth value then the character rate will be at the Farnsworth setting and the word rate will be at the TX WPM rate. You can also set the TX WPM and F-WPM from within a Macros.
CW configuration
The CW Configuration is easily reached from the Config menu or by right clicking on the left most entry in the status bar (CW).
Prosigns
The prosigns are configurable (see CW Configuration ). The defaults are:
| PROSIGN | KEYBOARD | DISPLAYED AS |
|---|---|---|
| BT | = | <BT> |
| AA | ~ | <AA> |
| AR | > | <AR> |
| AS | < | <AS> |
| HM | { | <HM> |
| INT | & | <INT> |
| SK | % | <SK> |
| KN | + | <KN> |
| VE | } | <VE> |
Operating Break-in
fldigi is not designed to operate full break in CW, but it does not prevent you from operating the transceiver in full or semi break-in mode. fldigi is always in one of three states: receive, transmit, or tune. Using either a
- Winkeyer-USB,
- Mortty,
- or a homebrew nanoIO CW interface
I operate both full and semi break-in as follows:
- fldigi mode set to CW with appropiate interface enabled (config CW / Winkeyer / nanoCW)
- transceiver set to CW, either full or semi break in ( I operate both IC7200 and FT-897D with no change in procedure) disable CAT Ptt
- press the keyboard Pause/Break (P/B) key to toggle fldigi between Rx and Tx states
- Alt/Meta-R will perform the same function as the Pause/Break key
- in the Tx state you can enter keyboard text and it will immediately begin sending
- in the Rx state you can enter keyboard text and it will begin sending when the P/B key toggles to Tx
- toggling the P/B key will immediately change state
- toggling to Rx using the P/B key does not clear the transmit buffer, transmit text begins again at the transmit cursor position
- to clear the Tx panel use the right-click popup menu in the Tx panel, if transmitting, press the T/R button to return to Rx and clear the panel
- create a clear Tx panel macro button
- add a "^r" or "^R" two character sequence to the end of the Rx text to automatically return to Rx and clear the Tx panel buffers.
- during transmit you can modify any text that has not yet been sent.
- during transmit you can left click on the remaining text to move the text insert cursor to that point.
- during transmit you can press the "Home" key to put the transmit cursor at the beginning of the transmit buffer, transmission will pause when the insert cursor point is reached
- characters will be sent as soon as entered from the keyboard, moving remaining text to the right for subsequent transmission
- pressing the "End" key will move the transmit text insert cursor to the end of the text and the reaming transmit buffer text will begin transmission.
- During transmit you can skip all remaining text by pressing the "Tab" key. Keyboard entry is enabled as above.
- During transmit you can press the "Esc" key to abort transmission. The Tx text buffers are cleared.
- Pressing the control-r will insert the "^r" sequence.
- Pressing control-t is the same as pressing the T/R key.
-
Pressing control-Tab will toggle the transmit insert cursor between end-of-text and the current transmit character point. Easiest way to insert text at current transmit point.
Keypad '+' increases WPM by 1 for each closure
Keypad '-' decreases WPM by 1 for each closure
If the transceiver is set to full break in you will hear Rx between code elements. If it is set to semi break in you will probably hear Rx after the delay interval set in the transceiver.
You will need to modify your operating paridigm to fit the above model.
CW Macros
Macros used for CW should be formated with attention to removing undesireable white space. White space includes SPACE, CR and LF.
fldigi will send each and every white space encountered in the macro string. Sending a space in CW takes time and may add undesired delays to the signal generation.
Each space requires 7 dot intervals to complete. At 30 WPM each dot is 1200 / WPM millisecond in duration. The space character causes an effective pause of 7 x 40 or 280 millisecond at 30 WPM. Three spaces equals 740 millisecond. The space occupies a period of time determined by the WPM setting.
| WPM | SPACE DELAY |
|---|---|
| 10 | 840 msec |
| 20 | 420 msec |
| 30 | 280 msec |
| 40 | 210 msec |
Here is an example of a CLEAR-ALL macro that looks inoccuous, but can result in a surprising delay in subsequent text tramission.
"<CLRRX> <CLRTX> <LOCK:off> <AFC:on>"
Each of the macro tags are referred to as immediate execute. The contents of the macro is parsed by the macro interpreter thusly:
| MACRO TAG | EFFECT |
|---|---|
| "<CLRRX> " | clears the receive screen and deletes the <CLRRX> from the macro string, leaving the space |
| " <CLRTX> " | clears the transmit screen deletes the <CLRTX> from the macro string, leaving two spaces |
| " <LOCK:off> " | unlocks the transmit frequency audio insertion point, deletes the <LOCK:off> from the maro string and leaves three spaces |
| " <AFC:on> " | turns AFC to ON (useless for CW since AFC is meaningless in the current implementation), deletes the <AFC:on> and leaves three spaces |
The macro string is left with three spaces which are then appended to the now clear TX panel. The next macro you try to execute appends it's text (less any immediate execute tag substitutions). For example the next macro you press might be the QRL macro.
"<TX>QRL de WA1SXK K<RX>"
The <TX> is immediate, it turns on the transmit processing. The macro string then becomes
"QRL de WA1SXK K<RX>"
The <RX> is processed by adding the command to restore receive in a first-in, first-out command queue. A hidden character (no space in transmit timing) is then added to the macro string.
"QRL de WA1SXK K_" where '_' represents the hidden character.
The result is then appended to the transmit buffer, which has the 3 spaces in place:
" QRL de WA1SXK K_"
and transmit begins with a 3 space delay before the first Q in QRL.
Remove the unnecessary spaces from the CLEAR-ALL macro.
"<CLRRX><CLRTX><LOCK:off><AFC:on>"
The transmit pending buffer is now left empty and subsequent macro or keyboard entries will not have the bonus 3 space start sequence.
SPACES count!